Crochet Summer Cardigan with Pockets
15 October 2020, 14:36 1335
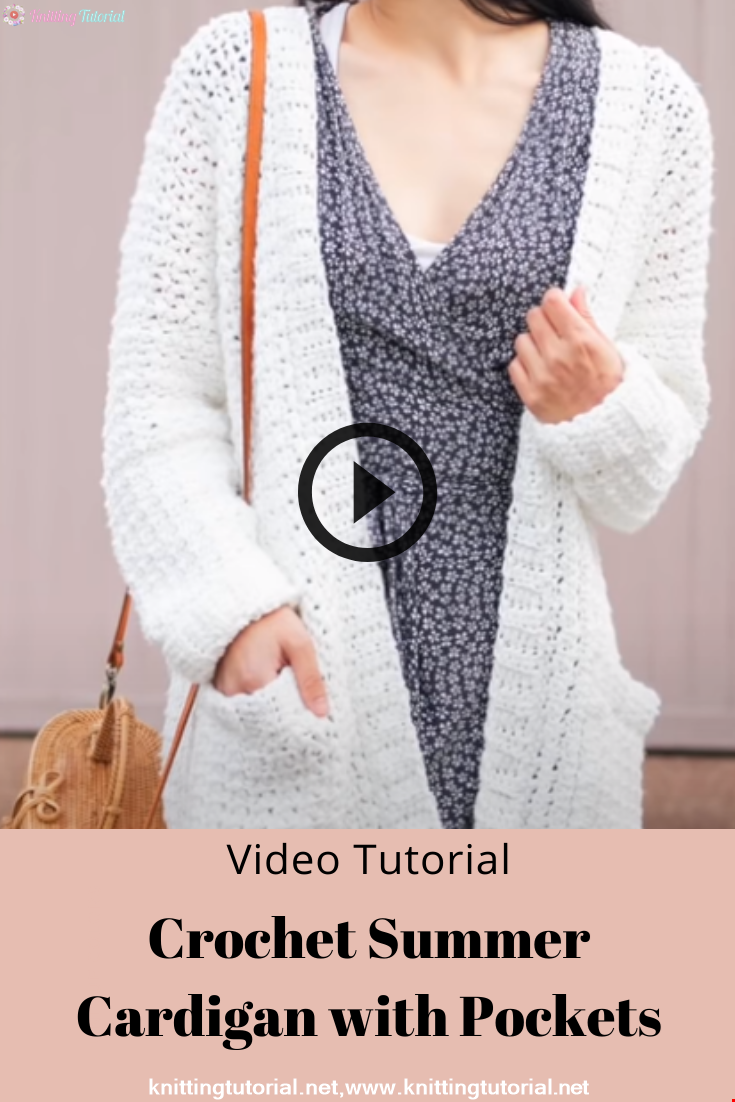
hey everyone today I’m gonna show you
how to make this textured crochet
cardigan you can easily make this
cardigan with pockets or without and
today I’ll be making a size small you
can find the free written pattern from
sizes extra small to three large for
free on my blog the link is down below
in the description bar
you will need chunky or bulky weight
yarn a seven millimeter crochet hook a
six millimeter crochet hook a dining
needle and some scissors today I’ll be
using knit picks or Wii crochets billow
yarn in the color white it’s a hundred
percent pima cotton so it’s very light
and soft and perfect for summer if you’d
like to make a cardigan for colder
weather substitute this yarn for chunky
acrylic or wool blend yawn beginning
with the seven millimeter crochet hook
create a slip knot insert your crochet
hook into the loop chain eighty the body
of the cadogan is which link waist so
the foundation chain runs the length of
the cardigan the front and back panels
are worked in one piece so we’re going
to begin with the first front panel to
start Row one wig in a single crochet in
the second chain from the hook to single
crochet insert your hook into the chain
yarn over and pull up a loop
yarn over and pull through to within
going to chain one
skip one chain and then single crochet
into the next chain
we’re going to repeat the pattern of
chain one skip one chain single crochet
into the next chain until the end of the
row each chain one counts as one stitch
at the end of the row you should have 79
stitches turn your work
to start row to chain one and the
turning chain of chain one doesn’t count
as a stitch single crochet into the
first stitch chain 1 skip the chain and
then single crochet into the next stitch
repeat the pattern of chain one skip one
stitch single crochet into the next
stitch until the end of the row
at the end of the road you should have
79 stitches turn your work
we’re going to repeat row two until the
end of row 20
at the end of row 20 this is what your
first front panel will look like
to start row one of the back panel chain
one single crochet into the first stitch
repeat the pattern of chain one skip one
stitch single crochet into the next
stitch until you have twenty-six
stitches left in the row
so once you’ve crocheted along and you
have 26 stitches left in the row chain
27
don’t worry if the chain extends past
the edge of your panel I’ll shrink once
we crochet the next row turn your work
to start row two of the vet panel single
crochet into the second chain from the
hook
chain one skip one chain and then single
crochet into the next chain
repeat the pattern of chain one skip one
stitch single crochet into the next
stitch until the end of the row
we’ve now crocheted along the chain and
you can see that it’s now the same
height as the edge of the front panel
continue to chain one skip one stitch
single crochet in the next stitch until
the end of the row
you should have 79 stitches in total
turn your work
the gap we created will be used to sew
the sleeves on to the body
to start row three of the back panel
chain one
single crochet into the first stitch
chain one skip one stitch and then
single crochet into the next stitch
repeat the pattern of chain one skip one
stitch single crochet into the next
stitch until the end of the row
Daniel ACK
repeat back panel Row three until the
end of back panel Row 60
once you’ve finished back on a row 60
altogether you should have a tea rose
we’re now going to repeat back panel Row
1 so to begin
chain 1 single crochet into the first
stitch
the pattern of chain one skip one stitch
single crochet into the next stitch
until you have 26 stitches left in the
row
when you have 26 stitches left in the
row chain 27
Daniel lek
we’re now going to crochet the first row
of the second front panel single crochet
into the second chain from the hook
repeat the pattern of chain one skip one
stitch single crochet into the next
stitch until the end of the row
at the end of the row you’ll have 79
stitches turn your work
to start row two of the second front
panel chain one single crochet into the
first stitch repeat the pattern of chain
one skip one stitch single crochet into
the next stitch until the end of the row
turn yet
repeat Row 2 of the second
panel until the end of row 20
in total you should have a hundred and
one rows
fast enough
we’re now going to crochet the sleeves
so to begin create a slipknot
and insert the six millimeter crochet
hook into the loop
we’re crocheting the sleeves from the
cuff up so we’ll start by crocheting the
ribbing to begin chain seven
to start row 1 we get a half double
crochet into the second chain from the
hook to half double crochet yarn over
insert your hook into the chain yarn
over and pull up a loop yarn over and
pull through all three loops half double
crochet in each stitch until the end of
the row
you should have six stitches turn your
work 4:02 we’re going to back loop half
double crochet so instead of picking up
two strands of yarn you’re only going to
pick up the loop furthest away from you
so chain one
yeah Nova pick up the loop furthest away
from you
yeah no sir pull through yarn over pull
through three
so back loop half double
shei until the last stitch of the row
and then place a normal half double
in the last stitch of the row making
sure that you pick up both the Sun and
back loop of yarn
at the end of row two you should have
six stitches turn your work and we’re
now going to repeat row two until the
end of row 16
once you have sixteen rows of ribbing
remove the six millimeter hook and
replace it with a seven millimeter hook
we’re now going to work our stitches
along the long edge of the ribbing
to begin row one of the sleeves chain
one single crochet into the first row
chain one and then single crochet into
the next row
repeat the pattern of chain one single
crochet into the next row until the last
row
at the end of row 1 you should have 31
stitches turn your work to begin row 2
chain 1 single crochet into the first
stitch
repeat the pattern of chain one skip one
stitch single crochet into the next
stitch until the end of the row
you should have 31 stitches in total
turn your work repeat Row two until the
end of row ten
this is what the sleeve should look like
at the end of row 10 to start row 11
chain 1 single crochet into the first
stitch
chain one and then single crochet into
the chain space
chain one and then single crochet into
the next stitch
chain one and skip one stitch repeat the
pattern of single crochet into the next
stitch chain one skip one stitch until
the last chain space of the row
single crochet into the last chain space
of the row
chain one and then single crochet into
the last stitch of the row
and totally should have 35 stitches turn
your work
repeat rows 2 to 11 until your sleeve
measures 40 centimeters or 16 inches
long
I crocheted until the end of row 42 the
sleeves are designed to be a bit longer
so you can roll up the cuffs
at the end of row 42 fast enough
fold your sleeve in half lengthways and
then whip stitch the edges together
and you’ve finished your first sleeve
repeat all the sleeve steps for your
second sleeve
we’re now going to assemble the cardigan
fold the front panels inwards on top of
the back panel
using safety pencil stitch markers to
hold the front panels in place whip
stitch together the top of the shoulder
seams
once you’ve said the shoulder seams
together wit stitch the sleeves to the
armholes don’t worry if your sleeve is a
little bit smaller than the armhole line
up the top of the sleeve with the
shoulder seam
use safety pencil stitch packets to hold
the sleeve in place
once you’ve sewed the sleeves to the
buddy if there’s still a gap underneath
the armhole
so the gap closed
once you cert the sleeves to the buddy
we’re going to crochet the neckline and
hemline ribbing separately
to begin with the hemline ribbing create
a slipknot inset the six millimeter
crochet hook into the loop chain six
half double crochet in the second chain
from the hook
half double crochet in each chain until
the end of the row
you should have five stitches in total
turn your work to start row two chain
one back loop half double crochet into
the first four stitches
you
half double crochet into the last stitch
of the row turn your work
repeat row 2 until you’re ripping
miche’s the length of your hemline
I crocheted until the end of row 67
use safety pins will stitch Mac is to
pin the ribbing to the edge of the
hemline whip stitch the cardigan and the
ribbing together
once you finish the hemline ribbing
follow the ribbing instructions until
the length of the ribbing Misha’s the
length of the neckline
I crocheted until row 114 pin the
neckline rubbing in place
and then whip stitch the ribbing to the
body of the Cadogan
once you finish sewing on the ribbing if
you don’t want to add pockets weave in
all of your ends
to crochet the pockets create a slip
knot insert the seven millimeter crochet
hook into the loop
chain 14
the foundation chain runs the length of
the pocket not the work to start Row one
single crochet into the second chain
from the hook repeat the pattern of
chain one skip one stitch single crochet
into the next stitch until the end of
the row
you should have 13 stitches in total
turn your work
to start row to chain one single crochet
into the first stitch repeat the pattern
of chain one skip one stitch single
crochet into the next stitch until the
end of the row
turn your work
repeat Row 2 until the end of row 15
fast enough
remember that we’re working the pocket
lengthways so the foundation chain runs
the length of the pocket
to crochet the ribbing for the pocket
create a slip knot insert the six
millimeter crochet hook into the loop
Chane six
to start row one half double crochet
into the second chain from the hook
half double crochet in each chain until
the end of the row
you should have five stitches in total
turn your work to start row two chain
one back loop half double crochet in
each stitch until the last stitch of the
row
half double crochet in the last stitch
of the row turn your work
repeat Row 2 until the ribbing miche’s
the length of the pocket
I crocheted until the end of row 11 fast
enough
whip stitch the edge of the ribbing to
the edge of the pocket
repeat these steps for your second
pin the pockets onto the front panels of
the cardigan I suggest trying on your
cardigan to make sure you like the
pocket placement whip stitch the edges
of the pocket to the cardigan
once you’ve finished sewing your pockets
to the cardigan weave in all of your
ends and you’ve finished your in the
clouds cardigan
Category Popular Posts
Watson Waffle Sweater Cardigan
15 October 2020, 14:38 30483
Korean Girl in Traditional Dress (Hanbok)
22 September 2020, 11:11 1575

This is the process how I made the amigurumi of Korean Bride in traditional dress Hanbok. Lately I've been watching a lot of Korean dramas and got inspired to make one. I hope you can enjoy the video, and get inspired too!
Read MoreY Auger construction
27 January 2022, 21:16 1252
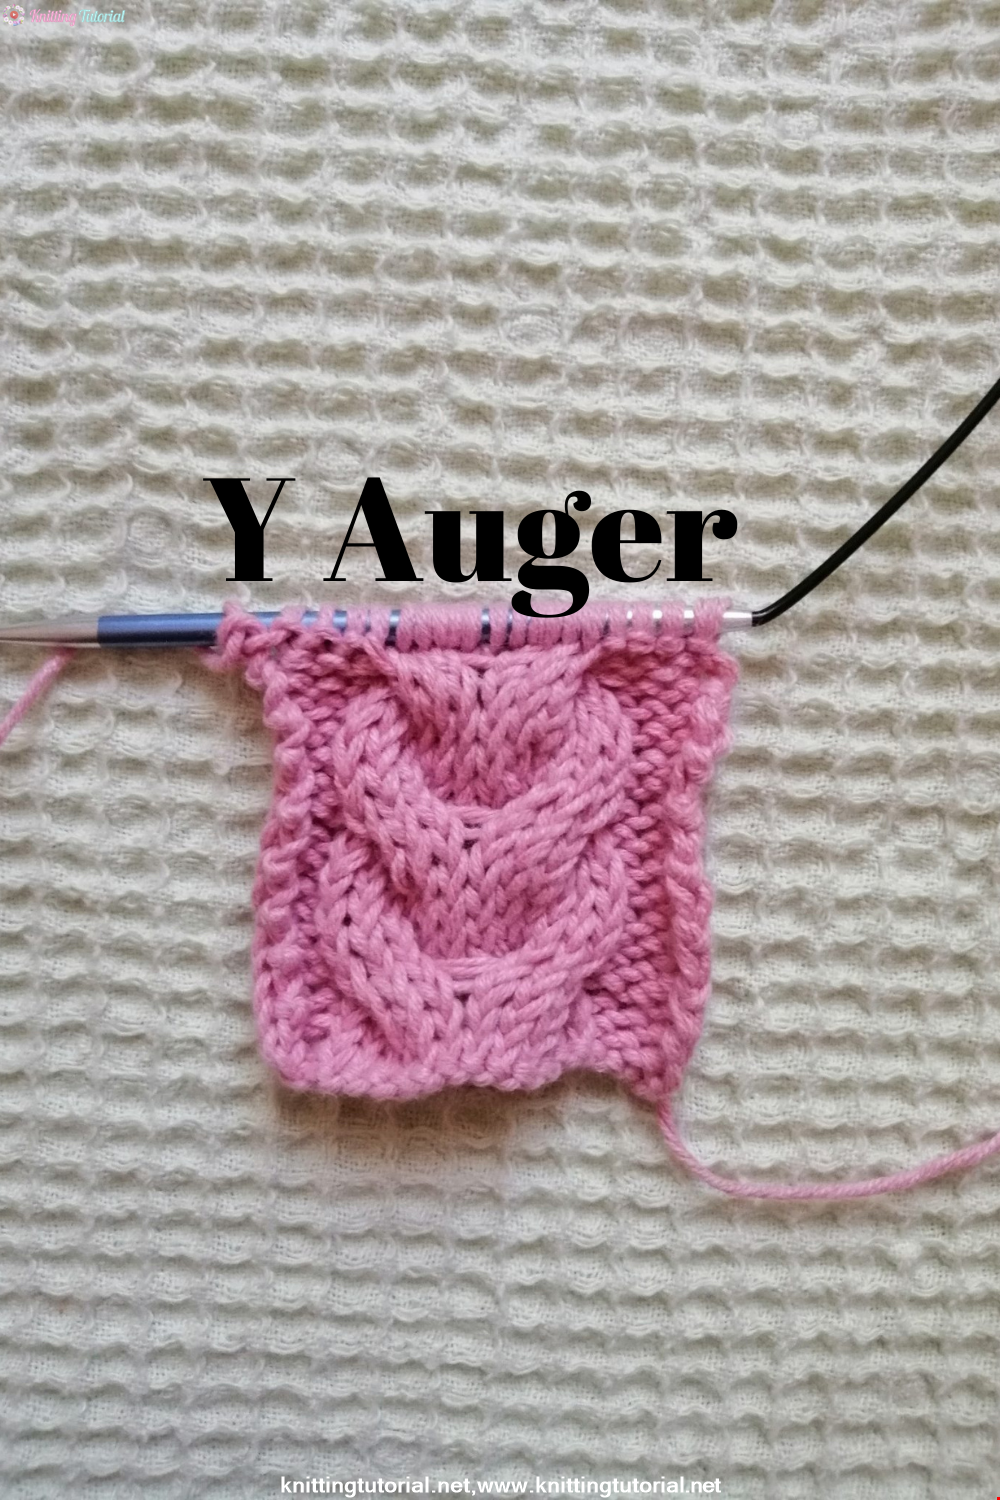
Hello everyone! We have prepared a Y twist model, which is very suitable for vests and cardigans, for you. This model is actually very easy to make! Let's start knitting this beautiful model right now!
Read MoreCat-Dog Sweater Making
18 January 2022, 21:05 1208

Hello, Shall we prepare our little friends for winter? Every living thing has times when it needs help. You can prevent our little friends from getting cold by knitting clothes that will keep them warm in cold weather. This will bring great happiness to you and the cute little ones. Let's get started right away!
Read More
Openwork Baby Cardigan Making
22 January 2022, 11:53 1253

Hello! Today we came to you with the construction of openwork baby cardigan. If you're ready, let's start.
Read More
Making a Winter Dog Sweater
18 January 2022, 21:17 1228

Are those who will enter the new year with their little friends ready? We have a very sweet knitting model for you. With its easy and fast preparation, it will be warm for your dog all winter!
Read More