It will take:
100 g of thick acrylic yarn (155 m. In 100 g) red color
A bit of white and dark gray yarn
Hook No. 4 and No. 5
Needle for yarn
[stextbox id = “gray” caption = “Used abbreviations:” float = “true” align = “right” width = “200 ″]
vp – air loop
SBN – single crochet
CH – double crochet
SS – connecting column
2 sc together – Reducing sc
2 CH together – Reducing CH[/ stextbox]
Knitting density:
3.5 CH and 1.5 rows = 2.5 x 2.5 cm. When crocheting a larger size.
3 vp at the beginning of the series are considered for 1 column.
Description:
Row 1: Larger crochet knit in the initial magic ring : 3 VP, 11 CH, SS in the top CE from 3 vp at the beginning of the row. (12)
Row 2: 3 vp, 1 CH in the same loop, 2 CH in each loop, SS in the top ce from 3 vp at the beginning of the row. (24)
Row 3: 3 VP, 2 CH in the next. loop, * 1 CH in the next loop, 2 CH in footprint. loop; Repeat from * to the end of the series, SS to the top ce from 3 vp at the beginning of the row. (36)
Row 4: 3 VP, 1 CH in the next. loop, 2 CH in footprint. loop, * 1 CH in the next 2 pet., 2 CH in footprint. loop; Repeat from * to the end of the series, SS to the top ce from 3 vp at the beginning of the row. (48)
Row 5: 3 VP, CH in the next. 7 pet., [3 CH in the next. loop, CH in the trail. 15 pet.] Twice, 3 CH in the next. loop, SN in the last 7 pet., SS in the top ce from 3 vp at the beginning of the row. (54)
Row 6: 3 VP, CH in the next. 8 pet., [3 CH in the next. loop, CH in the trail. 17 pet.] Twice, 3 CH in the next. loop, SN in the last 8 pet., SS in the top ce from 3 vp at the beginning of the row. (60)
Row 7: 3 VP, CH in the next. 9 pet., [3 CH in the next. loop, CH in the trail. 19 pet.] Twice, 3 CH in the next. loop, SN in the last 9 pet., SS in the top ce from 3 vp at the beginning of the row. (66)
Row 8: 3 VP, CH in the next. 10 pet., [3 CH in the next. loop, CH in the trail. 21 pet.] Twice, 3 CH in the next. loop, SN in the last 10 pet., SS in the top ce from 3 vp at the beginning of the row. (72)
Row 9: 3 ce, 2 CH together, CH in the next. 9 pet., [3 CH in the next. loop, CH in the trail. 9 pet., 2 CH together, CH in the next. loop, 2 CH together, CH next 9 pet.] Twice, 3 CH in the next. loop, CH in the trail. 9 pet., 2 CH together, SS in the top ce from 3 vp at the beginning of the row. (72)
Rows 10-11: Repeat Row 9. (72)
Rows 12-13: Repeat Row 9, but change color to white after the third decrease and knit with this color until the loop before the next decrease. Finish knitting a number of primary color, stretching the thread under the white part. Cut off the white thread, in the next row attach the white thread in the same place again.
Row 14: Knit RNS with white thread until the end of the row, performing [1 RLS, 2 para, 1 RLS] to the central RN at the increase of the previous row, CC to the first RLS. Shut down, hide tails of threads.
Ears:
Note: Each eyelet consists of two sides. The back side is completely from the main color, the front from white and main.
The back of the ears (tie 2 pieces). 10 inc.
Row 1: Sc in the 2nd loop from the hook and on to the end of the row. 1 vp, turn. (9)
Row 2: 2 sc together, 5 sc, 2 sc together. 1 vp, turn. (7)
Row 3: sc in each loop. 1 vp, turn. (7)
Row 4: 2 sc together, 3 sc, 2 sc together. 1 vp, turn. (five)
Row 5: sc in each loop. 1 vp, turn. (five)
Row 6: 2 sc together, sc sc. loop, 2 sc together. 1 vp, turn. (3)
Row 7: sc in each loop. 1 vp, turn. (3)
Row 8: 2 sc together, sc Sc. the loop. 1 vp, turn. (2)
Row 9: 2 sc together. (one)
1 ce, tie the side of the triangle to the bottom corner, complete 9 sc, 3 ce, turn the triangle clockwise and knit further into the initial chain of 9 sc to the next. angle, 3 ce, 9 sc to the tip of the triangle. RLS in 2 RLS together 9th Row, 3 vp, RLS in the same loop, SS in the first RLS. To finish work.
The front of the ear (2 pieces).
Knit as well as the back, only change color to white in 2-9 rows. Switch back to the main color after the 9th row and trim. Leave a long tip for stitching sides.
Sew the front and back sides together, sew to the cap.
————————–
Eyes and nose
With a smaller crochet hook, run 6 sc in the initial magic ring. SS in the first sc.
Row 2: 1 ce, 2 sc in the same loop and in each loop until the end of the row, ss in the first sc. Finish work, leaving a tail for sewing. (12)
Only for eyes
SS in each loop.
Sew eyes and nose to the cap.
Change of size
The model is designed for the size of the head of a child 5-8 years. To increase the caps, you can use the hook number 5.5 and add the number of repetitions of 9 rows before knitting the last 3 rows.
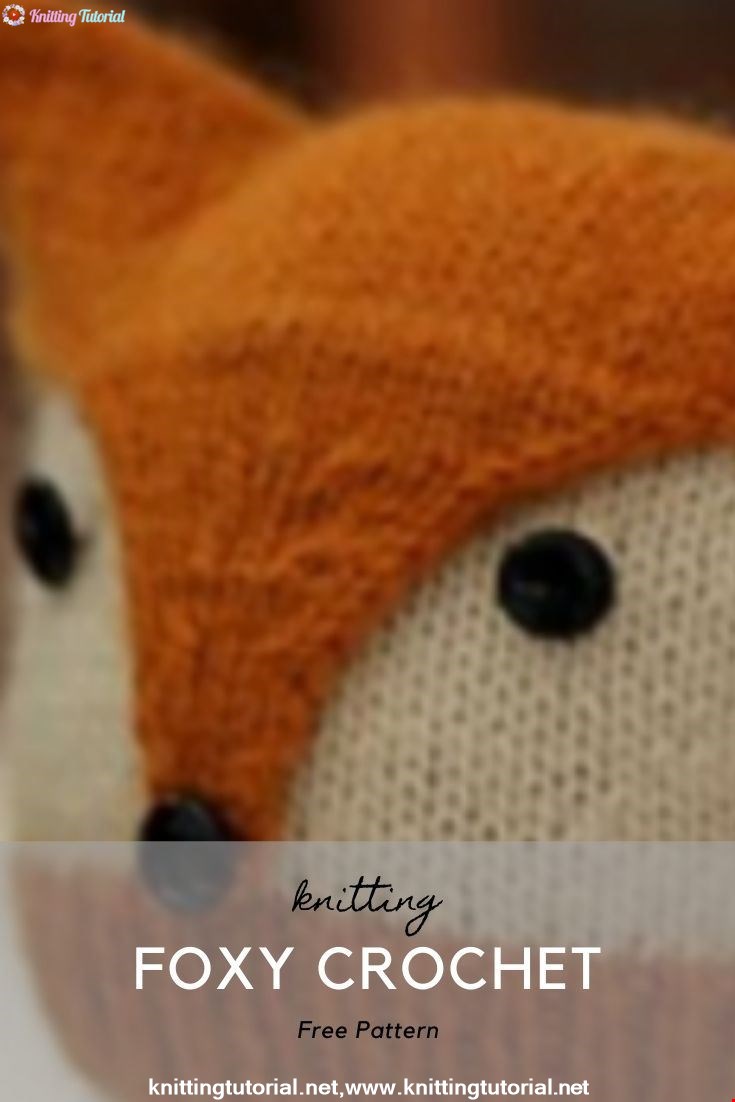
Such mittens like any child! And they do not tally fit. As a peephole, small black buttons on a leg that are easy to find on sale will look great. The kit can be linked to a hat-fox, below there is a photo of such a hat.
You will need:
Yarn of medium thickness of red, white and black colors
Hosiery needles No. 4
2 black buttons for peepholes
Needle for yarn
Description:
Dial 36 stitches with red thread, distribute for knitting in a circle on 3 needles (12-12-12).
Knit 20 rows of elastic 2×2 (2 persons., 2 w. Or desired length.
Redistribute the loops on the needles: 18-9-9.
Add 4 loops to expand the mittens:
* 1 increase (1 person. For the front, 1 person. For the back wall of the same loop, 16 faces., 1 increase * Repeat from * to *: (20-10-10).
10 rows of faces (or desired length).
Right mitten:
Increases for the thumb:
Row 1: 20 persons .; 1 increase, 5 persons., 1 increase, persons. up to the end of the row.
Series 2: Facial.
Series 3: 20 persons., 1 increase, 7 persons., 1 increase, persons. up to the end of the row.
Row 4: Facial.
Row 5: 20 people., 1 increase, 9 people., 1 increase, people. to the end of the row.
Row 6: Facial.
A row 7: 20 persons., 1 increase, 10 persons., 1 increase, persons. to the end of the row.
Row 8: Facial.
Row 9: 20 people., 1 increase, 11 people., 1 increase, people. to the end of the row.
Row 10: Facial.
A number 11: 20 persons., 1 increase, 12 persons., 1 increase, persons. to the end of the row.
(Move the first and last loops from the front spokes to the rear spokes)
Row 12: 18 persons. on the front spoke, 2 persons., put off the trail. 15 loops for the thumb, knit further in a circle of faces. to the end of the row.
Row 13: 18 persons. on the front spoke, 1 persons., 2 persons together., persons. to the end of the row.
(18-9-9)
Rows 14-20: Facial (or desired length before the start of the nose.)
Close loop trail. way:
14 faces., close the loop to the end of the row and the next 5 pet., leaving 9 pet. centered in front mittens. Pick up the first loop of closed loops to shift the nose to the left for the right mitten. (10 loops).
Turn. (Remove 1) Purl to end of row.
Turn. (Remove 1) Facial to the end of the row.
Turn. (Remove 1) Purl to end of row.
Turn. 2 together persons. tilted to the left, 8 faces. , 2 persons together.
Turn. (Remove 1) Purl to end of row.
Turn. 2 together persons. with a tilt to the left, 6 persons., 2 persons together.
Turn. (Remove 1) Purl to end of row.
Turn. 2 together persons. with a tilt to the left, 4 persons., 2 persons together.
Turn. (Remove 1) Purl to end of row.
Turn. 2 together persons. with a tilt to the left, 2 persons., 2 persons together.
Facial.
Purl.
Facial.
Put the hinges on a temporary holder (pin or thread). Cut the yarn, leaving the tail longer for later sewing on the nose.